(Source: C. Barton from Zebrafish Book 5th Edition)
Introduction
The Zebrafish International Resource Center (ZIRC) nursery utilizes an autonursery system to raise larval fish. An autonursery system can significantly reduce labor in the nursery because hand siphoning and cage cleaning are eliminated. Fish can also be fed earlier without the concern of diminished water quality.
An autonursery system is any system that delivers water to a nursery tank and allows it to exit the tank via an appropriately sized mesh drain. There are commercial autonursery systems available from some fish rack system manufacturers. Because these commercial autonursery systems are usually made to work with a specific company's rack system, it is often not feasible for an existing facility to incorporate a production model system into their existing nursery. Many facilities have developed their own autonursery system using materials readily available to the research community and often at a fraction of the cost of a commercial unit.
Before entering the autonursery at day 4, embryos are kept in Petri dishes at a density of 50 fish per dish. The Petri dishes are filled with 0.5xE2 embryo medium (Nüsslein-Volhard and Dahm, 2002). With 0.5xE2, the pH is more consistent and the osmolarity is between the range of standard embryo medium and our fish water. This rearing solution offers a more stable environment than standard fish water. Petri dishes are also dosed with methylene blue (dilution: 2ml of 0.1% methylene blue, to 1 liter of medium). This suppresses fungal outbreaks in Petri dishes, in the event that an egg goes bad. Petri dishes are also kept in a 29°C incubator.
There are three feeds used in the nursery: Paramecia, San Francisco Bay Brine Shrimp, and Zeigler AP Larval Diet. Detailed instructions on how to make each of these foods are covered in the Food Production and Recipes section.
Overview of autonursery protocol
...
- 0-4 day old fish are kept in Petri dishes, in 0.5x E2 embryo media (See RECIPES, Chapter 10)
- 4 day old fish are moved into autonursery tanks, without any water flow
- 5-9 day old fish remain in the autonursery, no water flow
- 10-15 day old fish are given 12 hour water flow, only at night
- 15-21 day old fish are given 24 hour water flow
- 21+ day fish are transferred out of the nursery and into the grow-out section of the main facility.
|
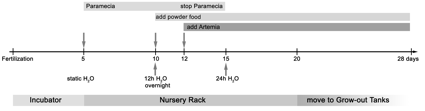
Fig. 1. Overview of location, water and food changes in the ZIRC Autonursery during the first 4 weeks of development. Top, Water changes. Middle (light shading), Location/container changes. Bottom, Feeding schedule. During the first 4 days (shaded area), Embryos and larvae are kept in an incubator at 29 ºC, in 0.5x Embryo medium (Nüsslein-Volhard and Dahm) to provide stable environmental conditions for early development. |
Detailed procedures for feeding in the nursery
...
Prepare three stock solutions, called E2A, E2B and E2C and use them to make a larger volume of the 0.5X E2.
E2A Stock: |
E2B: |
E2C: |
TO MAKE 20 LITERS 0.5X E2: |
Food Production and Feeding Zeigler powdered food recipe and feeding instructions
Ingredients: 150> Ziegler Larval Diet Powder150-250 Ziegler Larval Diet Powder
ZIRC Larval Diet Zeigler Mix: |
To prepare for nursery feeding, suspend a 0.5 gram spoonful of powder in 250 ml fish water. Feed each cage of 50 fish 5 ml.
Brine Shrimp
...
Remove the air stick from the cone and allow it to settle for approximately 5 minutes. Once the shrimp have settled, use the spigot at the bottom of the cone to drain off 100 ml of brine shrimp. Using a 105 µm mesh basket and fish water, rinse the brine shrimp gently to remove all the salt. Pour the collected brine shrimp into a 1 liter squeeze bottle and fill with fish water. Each tank of 50 babies should receive a 1 second squirt of this dilution, 2 times per day.
Decapsulation Method
Decapsulation of brine shrimp is a procedure that removes the cyst shell before hatching. Cysts are soaked in a chemical treatment that removes the shell. The brine shrimp are then stored in a saturated salt solution and refrigerated. Cysts remain viable in this state for upwards of 6 weeks. There are several benefits of decapsulating brine shrimp prior to use:
- Decreased chance of fish ingesting cyst shells, which can impact the digestive system.
- Air does not have to be removed to collect brine shrimp for feedings. This decreases the number of brine shrimp that die and spoil in the cone during repeated collections. It also decreases the time required to prepare brine shrimp for daily feedings.
- More accurate feeding dilutions, because you can drain a consistent amount from the cone without having to remove the air.
...
*Should be prepared in advance kept chilled at 4ºC prior to use.
Bleach, ~6% Laundry Grade: |
Salt Solution 25 ppt: |
Lye (NaOH) Solution 40% (w/v): |
Buffered Salt Solution: |
Sodium Thiosulfate Solution 1.0%: |
Saturated Brine: |
Procedure:
1. Cyst hydration: Hydrate one full can of dried cysts in 5 liters of tap water in a hatching cone with aeration for 1 hour at room temperature. Examine the cyst under a stereoscope with top lighting before proceeding. Dry cysts are dimpled, resembling a deflated basketball, whereas fully hydrated cysts are completely spherical in shape. The cysts must be fully hydrated before decapsulation. If cysts are not completely spherical after 1 hour, continue the hydration process (for a maximum of 2 hours), checking the progress of the cysts under a microscope every 15 minutes.
2. Filter and rinse cysts: Collect the hydrated cyst in a 125 µm mesh bag and rinse with cool tap water.
3. Transfer cysts back to the cone with the chilled Buffered Salt Solution and aerate (save a filled squirt bottle of salt solution to help transfer cysts to cone).
4. Decapsulation: Add the chilled bleach (4.3 liters) to the cone and continue aeration. Watch the cysts turn from brown to grey to orange. When the cysts are 90% orange, stop the reaction by quickly siphoning the cysts through a 125 µm mesh bag and rinsing well with cool tap water.
5. Neutralization of residual chlorine: To neutralize any residual chlorine transfer the mesh bag to a clean 4 liter beaker and pour the 1.0% Sodium Thiosulfate (3 liters) into the bag. Soak the cysts in the Sodium Thiosulfate Solution for ~1 minute, then rinse the cysts with dechlorinated tap water.
6. Dehydration for long-term storage: Transfer the cysts back to the cone with 4 liters of saturated brine and aerate for 18-24 hours (save a filled squirt bottle of saturated brine solution to help transfer cysts to cone). Add granular NaCl as needed to keep the solution saturated during the dehydration process. Transfer dehydrated cysts to (5 or 6) 1 liter bottles and fill with clean saturated brine. Store in refrigerator.
Cone Set Up and Feeding Instructions
...