...
Vendor: Air Component Specialties, Inc. 10347 S.E. Division Portland, OR 97266 (503) 257-9848
Manufacturer: Clippard Instrument Lab, Inc. 7390 Colerain Road Cincinnati, Ohio 45239 (513) 521-4261
|
|
|
|
|
|
|
|
|
|
|
|
|
|
|
|
|
|
|
|
|
|
|
|
|
|
|
|
|
|
|
|
|
|
|
|
|
|
|
|
|
|
|
|
|
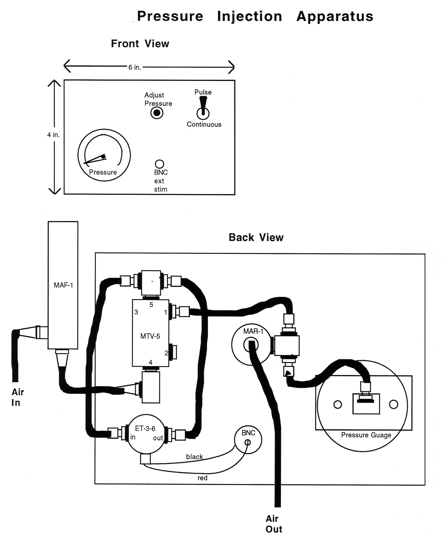
Figure 10.
The "air in" in this system can come from an in house supply of air, but a nitrogen or compressed air tank can provide higher pressures. The "air out" goes directly to the pipette. Just before use, backfill the pipette (i.e. from its butt end) with 0.2 M KCl applied behind the dye solution. You can buy a long thin syringe needle for this purpose (Hamilton) or pull out a suitably long capillary from a Pasteur pipette. Mount the pipette on the holder. With another manipulator, advance a glass rod fire polished at the end to produce a ball about 3 mm in diameter. This ball is used to break the point of the pipette by gently advancing it against the ball, under the 20x objective. After breaking, you will be able to see that the end is just a bit blunt. A good pipette for injection, even in the small blastomeres of a late blastula, will have a resistance of about 80 megohms, as measured in a bath of Embryo Medium. The bath is grounded by an agar-bridged silver-silver chloride ground wire.
...
Collected the embryos about an hour after fertilization, stage, and clean. Under a stereo dissection microscope, remove the chorions with fine sharpened watchmakers forceps (Dumont no. 5) by gently teasing open a hole in the chorion, widening it sufficiently and carefully shaking out the embryo (see Removing Embryos from their Chorions, page 4.3, for more details). This is done in Embryo Medium, in agar-coated Petri dishes (2% Difco Bactoagar). Once the embryos are free of the chorion, transfer with a fire polished pipette through several rinses in Embryo Medium to a clean agar dish.Using both Embryo Medium and agar dishes greatly improves survival during and following dechorionation. Embryo Medium contains elevated Ca2+ that helps to keep the cells intact, and the agar provides a smooth nonstick surface for the embryos to sit. If you put a dechorionated embryo at cleavage or blastula stage directly on the plastic surface of a dish, and carry the dish around, you may end up with fragments or a dissociated suspension of dead cells. After the injection, return the embryos to agar dishes for incubation, unless they are to be viewed immediately.
For the injection, mount the embryo in a depression slide in a drop of Embryo Medium, or if you need to orient it in a position in which it will not lie still, use 3% methylcellulose in Embryo Medium (see Methyl Cellulose Mounting, page 4.7).
...
The essential equipment for time lapse recording is the same as for single looks, with some additions. Minimally a shutter and shutter controller are required for the fluorescence light source and a computer (or stimulator) to synchronize the timing of the shutters with storage of the image onto the storage device. It is nice to have a similar control for the white light source. The computer can also control the fine focus control of the microscope, and take 4-d video movies of the clone at multiple focal planes. Additionally, the computer can control movement of the microscope stage, for X,Y excursion. Most confocal microscopes can be equipped for time lapse recording.For time lapse analysis, mount embryos in 0.1% Agarose (dissolved in Embryo Medium) inside of a viewing chamber (see section on Viewing Chambers, page 4.4) with 3 spacers in between. Pipette the embryo directly into a test tube containing several ml of warm Agarose using a fire polished pipette, then pipette the embryo along with a small volume of Agarose directly onto the bridged viewing chamber. Orient the embryo with a nylon hair loop before coverslipping, the Agarose will harden slowly and will never completely gel, but the coverslip will help immobilize the embryo in the desired position. Seal the chamber with Vaseline® to keep it from drying. Animals develop normally, albeit a little more slowly than normal in these chambers, and can be left as long as 24 hours. (If a firmer Agarose is used, the embryo will not develop normally for such a long time.) To remove an embryo from a bridged coverslip chamber, immerse the chamber in a large volume of Embryo Medium and gently pry apart the two large coverslips. If done gently, the embryo should pop out of the Agarose and fall onto the bottom of the dish.