mRNA In Situ Hybridizations For Larval Fish
- Jonathan Knight
- Anne Eagle
- ZFIN Admin
(Source: D. Parichy from Zebrafish Book 5th Edition)
Probe preparation
All steps after 2 must be performed RNAse free.
cDNA template preparation
1. Linearize cDNA by digesting with an appropriate restriction enzyme for 2 hours at 37°C. Typically, digest enough DNA so that it can be used for multiple riboprobe syntheses, e.g.:
20 µg plasmid DNA + ddH20 174 µl
10x restriction enzyme buffer 20 µl
BSA 2 µl
restriction enzyme (10U/µl) 4 µl
2. Avoid using restriction enzymes that leave a 3' overhang (e.g., Sac I, Kpn I, Pst I), because this can result in inappropriate transcription of sense RNA that may contribute to background. Alternatively, overhangs can be filled using DNA polymerase I (Klenow) after restriction digestion.
3. Add equal volumes of phenol-chloroform-isoamyl alcohol (pH 8.0), vortex 10 sec and then centrifuge at maximum speed for 5 min.
4. Remove aqueous (upper) phase to new RNAse-free 1.5 ml tube (do not disturb interface between phases).
5. Add 0.1x volume 3 M sodium acetate pH 5.2 and 2.5x volume 100% ethanol, vortex and leave on ice for 15 min.
6. Centrifuge at maximum speed for 15 minutes at room temperature.
7. Remove supernatant and add 1 ml 70% ethanol, centrifuge at maximum speed for 5 minutes at room temperature, draw off supernatant and air dry briefly.
8. Resuspend in ddH20 at 1-2 times the original volume that you took from your plasmid prep.
9. Check cutting efficiency and determine template concentration on a 1% Agarose gel. Run 0.1 µl of sample on gel (dilute 1 µl DNA into 9 µl TE, then dilute 1 µl of this into 9 µl TE). Run alongside 250, 500 ng Hind III digested lambda DNA to estimate concentration. Make sure that templates are completely linearized, because circular DNA will result in probes that include the vector sequence.
10. Store cut DNA at -20°C.
Riboprobe synthesis
1. Set-up in vitro transcription reaction at room temperature. Low temperature and excessive DNA concentrations can result in precipitation. Mix reaction at room temperature but keep enzymes and RNase inhibitor on ice. Reaction (and precipitation) volumes can be scaled up as needed.
1 µg linearized DNA x µl
ddH2O 9-x µl
5x transcription buffer 4 µl
100 mM DTT 2 µl
RNase inhibitor 1 µl
DIG-labeling mix 2 µl
RNA polymerase (T3, T7, or Sp6) 2 µl
(scale up this reaction and subsequent steps as needed)
2. Vortex gently to mix and then spin to bottom of tube.
3. Place in a 37°C air incubator for 2-4 hours.
4. Digest the template cDNA by adding 2 µl RNAse-free DNAse for 15 minutes at 37°C.
5. Stop the reaction and precipitate the probe by adding:
0.5 M EDTA, pH 8.0 2.0 µl
4 M LiCl 2.5 µl • 100% EtOH 75.0 µl
6. Place at -80°C, 10 minutes to overnight. Spin at maximum speed 30 min.
7. Remove supernatant and wash with 70% EtOH, spin 5 min, remove supernatant and air dry briefly.
8 Resuspend by vortexing in 100 µl ddH2O and then add 1 µl RNAse inhibitor (e.g. Superasin).
Probe fractionation
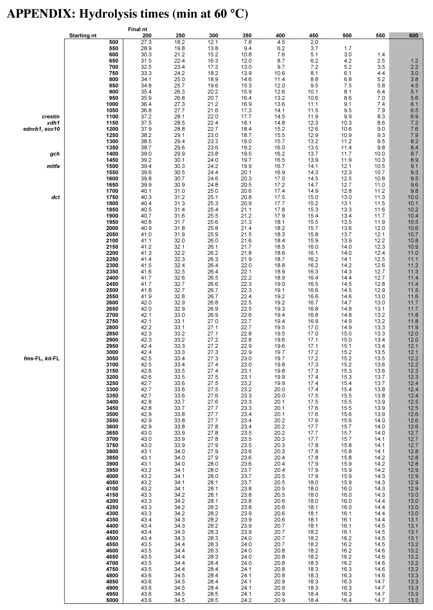
Alkaline hydrolysis is used to fragment probes greater than 300 nt. Do not hydrolyze all of the probe, because the intact probe will be analyzed for quality, below.
1. Mix together:
intact probe 50 µl
nano H20 30 µl
0.4 M sodium bicarbonate 10 µl
0.6 M sodium carbonate 10 µl
2. Heat in a water bath at 60 °C for the time indicated in the Appendix at the end of this section, or by calculating:
t (min) = (starting kb - desired kb) / (0.11 x starting kb desired kb)
e.g., for a ~3 kb probe fractionated to 0.6 kb, t = 12.1 minutes.
For larval in situs, it is important to fractionate the riboprobe to allow efficient penetration into the tissues; use 600 nt as an average final size.
Hydrolyzed probe precipitation
1. Mix together:
fractionated probe 100 µl
nano H20 100 µl
3 M sodium acetate pH 4.5 20 µl
glacial acetic acid 2.6 µl
100% ethanol 600 µl
2. Chill at -80°C for 10 minutes to overnight, spin at maximum speed 30 min, pour off supernatant, wash with 70% EtOH, spin 5 min, remove supernatant, air dry briefly, resuspend by vortexing in 50 µl ddH2O and add 1 µl RNAse inhibitor (e.g. Superasin).
Check riboprobe quality on an Agarose/MOPS/formaldehyde gel
1. Prepare gel.
33 ml ddH2O
4 ml 10xMOPS buffer2
0.6 g Agarose
2. Melt in microwave and when cool enough to touch add 2.2 ml 37% formaldehyde, swirl and pour immediately. Cover the gel box while gel sets.
Prepare samples
1. To PCR tubes, add:
3 µl RNA loading buffer3
2 µl ddH2O
1 µl riboprobe
2. Prepare an extra tube as above for an RNA ladder (stored at -80 °C).
3. Heat all tubes at 65°C for 15 minutes and then quick chill on ice. It is essential to denature the single stranded RNA molecules, which otherwise will migrate as a smear or as irregular bands that cannot be evaluated.
Run gel
Use 1X MOPS as the running buffer, load all of sample and run at medium voltage (~100V). Do not add ethidium bromide (it is already in the RNA loading buffer).
Inspect probe
Successful probe synthesis should yield a single fragment at the expected size for intact probes and a smear around the predicted final average size for fragmented probes. If this is not observed, DO NOT PROCEED with in situ hybridization!
Check riboprobe concentration by dot blot
1. Prepare dilutions. To 6 rows of a microtiter plate, add 9 ml of ddH2O in as many columns as you have probes to check. Add 2 additional columns of wells for controls. To the uppermost row, add 1 ml of each sample and mix into the 9 µl of H2O. With the same pipette tip, take 1 ml of the diluted probe and add to the next row. Repeat to make a series of dilutions ranging from 10-1 to 10-6. To the control wells, add 1 µl of 100 ng/µl control DIG-labeled RNA (Roche) and serially dilute as for probes.
2. Prepare dot blot. To a small piece of Amersham Hybond N+nylon membrane in a 60 mm or 100 mm Petri dish, add 1 µl of each dilution in rows and columns with a micropipette. Avoid touching the membrane with the pipette tip and place rows and columns just far enough apart so that spots do not merge. Label tops of columns with pencil or extra fine point pen (e.g. Sharpie). Array control RNA dilutions on either side of probe dilutions. Once spotted, place membrane in 60°C air incubator to dry.
3. Incubate dot blot. Wash blot briefly with PBST5 two times, then block with blocking reagent13 for 10 min. Add anti-DIG alkaline phosphatase conjugated antibody to a final concentration of ~1:5,000-1:10,000. Incubate for 20 min. Pour off antibody and wash 4 x 5 minutes each with PBST.
4. Develop dot blot. Replace PBST with AP buffer16. Rinse 3 times with AP buffer. Replace with NBT/BCIP staining solution17 and allow to develop without agitation until a range of control dots become visible (typically 5-10 min). Rinse twice with ddH2O and dry in air incubator.
5. Estimate probe concentration. Compare staining of control DIG-labeled RNA dots (10-1=10 ng, 10-2=1 ng, etc.) to probe dilutions to estimate probe concentration. Successful probe synthesis, hydrolysis and recovery should yield probe at 50-100 ng/µl.
6. Store probes at -80 °C.
In situ hybridization
Days 1-2: Harvesting fish and tissue fixation
Days indicated are minimal estimates.
1. Prepare fix: 4% paraformaldehyde, 1% DMSO in PBS. Fix should be made fresh on the day it will be used. Do not store it for long. DMSO will assist penetration into tissues. Scale according to the amount of tissue to be fixed.
a. Add 200 ml PBS4 to an Erlenmeyer flask and heat in microwave.
b. Add 8 g paraformaldehyde (toxic: wear gloves, do not breathe).
c. Add stir bar, cover, and place on hot plate at medium heat. The powder should dissolve quickly.
e. Place on ice to cool.
f. Add 2 ml DMSO .
2. Harvest and fix larvae. It is important to avoid contaminating with fix. Fish room dishes and nets are intended to prevent such contamination from occurring.
a. Collect larvae in a fine screen net. Be gentle, larvae are fragile.
b. Transfer larvae to a large disposable Petri dish with a small amount of fish water.
c. Optional: add several drops to several ml of 10 mg/ml epinephrine. After several minutes, this will cause melanosomes to move to the centers of the melanophores. This is useful for examining expression in melanophores themselves, or to get melanin out of the way for visualizing deeper tissues.
d. Fill a second large disposable Petri dish half way with fix.
e. Pour larvae into a fine net (for fix use only), and then transfer them into a dish with fix.
f. Leave at room temperature for ~10 min.
g. Use a scalpel or razor blade to remove heads, tails, or both, to improve reagent penetration.
h. Trim a plastic transfer pipette so that it has a wide opening. Use this to transfer the trunks into a 50 ml plastic centrifuge tube (e.g. Falcon).
i. Top off with fix and place on a rocker at 4°C, overnight at least. We typically perform in situs on larvae fixed for one or two nights.
Dehydration
Methanol precipitates proteins and removes cell membranes, permeabilizing the tissue. Although embryos can be stored for long times in methanol at -20°C, we prefer to store larvae no more than 1-2 days because signal can be lost if they are not fixed thoroughly. Storing in "fake hybridization" solution at -20°C is probably preferable.
1. Use an RNAse-free pipette to remove fix.
2. Replace fix with 100% methanol.
3. Rinse 2 x ~3 minutes each with 100% methanol. Pouring usually works unless the larvae float.
4. Place at -20 °C overnight, or proceed immediately.
Day 3: Prehybridization
Rehydration
Transcripts are vulnerable to RNAse during these steps. Work rapidly.
1. Remove larvae from freezer and allow them to warm ~10-15 min.
2. While larvae are warming, prepare fresh 4% paraformaldehyde (as above but without DMSO). Cool to room temperature.
3. Remove methanol from larvae and serially replace 2-3 minutes each with:
75% methanol / 25% PBST5
50% methanol / 50% PBST
25% methanol / 75% PBST
100% PBST
100% PBST
Use a plastic squirt bottle for more rapidly dispensing PBST in these and subsequent steps. Trim the tip of the spigot to allow a larger volume to be dispensed with less force on the tissue. Always start each round of in situs with freshly made PBST.
4. Replace one more time with 100% PBST and leave on rocker with gentle agitation.
Proteinase-K7 treatment
Proteinase-K (PK) treatment is critical for permeabilizing tissue and degrading RNA binding proteins that may hinder access of the riboprobe to the target mRNA. Different times and concentrations are appropriate for different stages, tissues of interest and probes. When first using a probe, it is best to try a couple of different PK concentrations and incubation times to determine which will be appropriate (e.g., a more extensive treatment may be ideal for deeply situated bones, but a more gentle treatment may be better for pigment cells immediately under the skin). Too little or too much PK treatment can reduce signal. Also, beware the lots of PK can vary in activity, so whenever possible make up large quantities of concentrated stocks and use the same lot number for a given set of experiments. The treatments described below include DMSO to facilitate PK penetration into tissues.
1. Prepare a solution of 10-20 µg/ml proteinase-K7 in PBST containing 1% DMSO. Reasonable concentration/time ratios to try are:
20 µg/ml, 15 minutes (early metamorphic larvae)
20 µg/ml, 20 minutes (mid metamorphic larvae)
20 µg/ml, 25-30 minutes (late metamorphic larvae)
20 µg/ml, 30-45 minutes (juveniles with scales)
10 µg/ml, 12 minutes (very superficial tissues)
Proteinase K concentrations and incubation times should be determined for each probe and stage. Deep tissues or longer fixation times may require longer PK treatments. The smaller or more accessible the specimen, the less treatment required (e.g., less time for larvae with heads removed compared to heads intact). If possible, use >1 treatment per probe to ensure staining as well as positive control probes known to stain tissue layer at the depths of interest.
Proteinase K is expensive. Make only as much solution as will be needed to allow gentle agitation of larvae. Use only proteinase K aliquoted for in situs. Left over proteinase K should not be refrozen for in situs, but can be kept and used for routine molecular biology.
2. Replace PBST with proteinase-K solution.
3. Gently rock on shaker for 12-60 minutes depending on probe, tissue and stage.
4. Optional: To stop PK activity rapidly, rinse 2 times with PBST then incubate 10 minutes in freshly prepared 2 mg/ml glycine in PBST, followed by rinsing 2 times in PBST.
5. Replace with 4% paraformaldehyde (which should already be at room temperature).
6. Fix 20 minutes at room temperature with gentle rocking.
Prehybridization
1. Wash larvae 3 times in PBST, 3 minutes per wash.
2. Remove PBST and replace with "fake" hybridization8 solution.
3. Allow larvae to sink and replace with fresh "fake" hybridization solution. Repeat once more for three total washes in fake hybridization solution. Specimens may be safely stored at -20°C after this point.
4. Use an RNAse-free wide mouth transfer pipette to divide larvae (and fake hybridization solution) among 5 ml glass vials that will be used for hybridization. To label the vials, it is best to number them 1,...,n and keep a log of the respective treatments; this will simplify labeling during later steps. A wide black permanent marker (Sharpie) can be used to label the caps, but this should not be relied upon because the label can sometimes come off. A better method is to use a diamond scribe to etch the number onto the side of the glass.
5. Replace the solution in the vials with hybridization solution9 (fill vials at least two-thirds full).
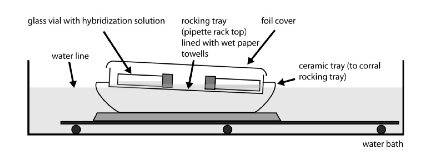
6. Place vials in shaking water bath set to 58°C - 68°C10 with ~30 oscillations per minute. Place the vials on their sides in a covered tray lined with paper towels and containing water a few mm deep11. Allow the tray to float within a larger, water filled tray that is stationary on the moving water bath platform. Larvae should be moving gently.
7. Prehybridize 3 hours to overnight.
*Day 3: Hybridization
Prepare hybridization solution9*
For each probe to be used, fill sealable tubes with enough hybridization solution for each sample vial (one tube per sample vial, or make a master mix with about 10% more solution than you expect to need). Typically ~1500 µl of hybridization solution is used per vial. Use enough to cover the larvae and allow them to move back and forth; the vial does not need to be completely filled. To keep about the same ratio of tissue to solution, scale up or down as needed.
4. Add appropriate volume of fragmented probe to hybridization solution. Typically, use probes at a concentration of 0.5 ng/µl. Probe concentrations may need to be determined empirically. For many probes, a dilution of 1:150 - 1:300 works.
5. Preheat hybridization solution in water bath at 58°C - 68°C10,11. Use lower temperatures only if absolutely necessary to obtain signal.
Hybridization
1. Replace prehybridization solution with hybridization solution. Do not allow the larvae to cool; it is best to work rapidly and remove only one vial at a time from the water bath.
2. Leave vials overnight (8-16 hours) at 58°C-68°C with gentle agitiation10,11.
3. Periodically check the water bath and refill as needed to replace water lost due to evaporation. If a large volume must be added, preheat the water in microwave.
*Day 4: Hybridization washes and antibody block
Washes*
For maintain stringency during washes, use the same temperature as for hybridization10 (58°C-68°C). Do not let the samples cool. Work rapidly and remove only one vial at a time from the water bath. These washes do not need to be performed RNAse free.
1. Preheat all wash solutions in 50 ml centrifuge tubes or flasks as appropriate. Use 5 ml solution per sample, for washes done in glass vials (2xSSCT, step 2 below). Use 2 L beakers covered with Saran wrap or sealable Tupperware containers for washes done in plastic carriers (0.2xSSCT, 2xSSCT, step 3 below).
Remove hybridization solution and wash with:
• 2xSSCT 10 min, 58 °C-68°C
• 2xSSCT 10 min, 58 °C-68°C
Transfer larvae from glass vials to plastic carriers, and immerse in:
• 0.2xSSCT 30 min, 58-68°C
• 0.2xSSCT 30 min, 58-68°C
• 2xSSCT 2 h, 58-68°C
Perform high stringency washes for the same times as typically used for in situs of embryos. However use an additional long wash at medium stringency to allow excess probe, melted at high stringency, to diffuse from the tissue.
4. Using a wide mouth pipette, transfer larvae from carriers to new vials at room temperature and perform additional washes to transfer larvae to PBST (or MAB13). Larvae may be sticky at this stage, so do not rock vials; instead swirl gently a few times at each step.
• 66% 2xSSCT / 33% PBST (or MAB) 3 min, room temperature
• 33% 2xSSCT / 66% PBST (or MAB) 3 min, room temperature
• PBST (or MAB) 3 min, room temperature
Note: Sensitivity might be enhanced by avoiding PBS, as the phosphate may under some circumstances inhibit alkaline phosphatase activity. Maleic acid buffer (MAB) is a standard substitute but is expensive. Tris buffered saline (TBS) may be a reasonable compromise. We have seen little difference among buffers, however, and routinely use PBS.
Antibody block and antibody preparation
1. Remove PBST from the vials and fill the vials ~half full with standard blocking solution14 for PBST-based incubations (or Roche block15 for MAB-based incubations).
2. Allow larvae to sit several minutes in blocking solution with only occasional swirling.
3. Place vials on a rocker with gentle agitation, 2-3 hours at room temperature or overnight at 4°C.
DAY 4: Antibody incubation
1. dilute anti-DIG Fab fragments 1:5000 in blocking solution; generally 1.5 ml per vial
We no longer preabsorb the antibody with fish powder16.
2. replace blocking solution with antibody
3. place vials on rocker with gentle agitation at 4 °C, overnight (!12 hours) or over two nights (36-48 hours), which may enhance antibody penetration
*DAY 5: Antibody washes
Rinse*
Remove Ab from vials and replace with PBST (or MAB). Diluted antibody can be re-used: pass through a 0.2 µm syringe filter to sterilize and store appropriately labeled at 4°C. Use only fresh antibody for larval in situs, but used antibody is appropriate for embryos or for blotting.
Dialysis washes
1. Use pre-numbered plastic carrier vials with mesh-covered holes on top and bottom17. Inspect the carriers to see whether relabeling is needed, if so use a permanent marker (e.g. Sharpie) on the mesh, not on the plastic (it will wash off). Verify that the mesh is firmly attached to the plastic.
2. Fill a 2 L glass beaker with 2 L of PBST26 (or MAB13). Add a medium size stir bar.
3. Place the open plastic carrier in a Petri dish and pour larvae into it. If necessary, use a wide mouth transfer pipette to assist with this. Screw the cap on tightly (otherwise it will come off during the washes and the larvae will float out).
4. Place the plastic carrier into the 2 L PBST2 (MAB) beaker. Use a transfer pipette placed against one end to suck out any air bubbles.
5. Once all plastic carriers are in, place the beaker on a stir plate at 4°C. Stir just fast enough so that carriers are drawn down to the bottom, but not so fast that the carriers will be damaged.
6. Stir for 1-2 times overnight (12-48 hours) at 4°C with ~3-5 changes of PBST2 (or MAB). Because washing depends on diffusion of excess antibody out of the specimens, wash for as long as the initial antibody incubation.
*Days 6-7: Developing and storage
Rinse into freshly made alkaline phosphatase (AP) buffer18*
1. Pour larvae from plastic carriers into 50 x 9 mm (#1006) sealable plastic Petri dishes (Falcon). Label the edges of both top and bottom with black marker.
2. Remove PBST and replace with enough AP buffer to cover larvae. Rinse with gentle agitation ~5 minutes at room temperature. Dispense AP buffer and staining solution (below) from a squirt bottle, as for PBST above.
3. Change AP buffer 2 more times ~5 minutes each.
Developing
1. Replace AP buffer with staining solution17 (NBT/BCIP in AP buffer) at room temperature. Typically ~8-10 ml staining solution per dish is appropriate. The staining solution is light sensitive.
2. Leave in staining solution covered at room temperature with minimal agitation on a slow shaker. Check after ~1 hour and then at increasing intervals over several hours to days. If you are concerned about leaving the specimens staining unattended through the night, place them at 4°C; otherwise be sure to change the solution before the end of the day.
3. Change staining solution with freshly made solution when it starts to lose its yellow or straw color. Use frequent changes, especially early in the reaction, because this is when the alkaline phosphatase is probably most active.
4. Periodically examine the larvae under the microscope to monitor staining progress. Reasonably stained larvae may appear nearly uniformly black to the naked eye. It is crucial that the specimens be viewed with appropriate magnification. Illumination from the side, as opposed to directly from above or below is usually helpful, as are different microscope stage backgrounds (black, white, etc.) depending on specimen thickness, contrast, etc. Good staining may take anywhere from 2-72 hours, so do not discard samples if they do not develop color quickly. It may be advisable to stop sets of larvae at different times to avoid potential over staining.
Stopping
1. Replace staining solution with alkaline phosphatase stop solution: PBS pH 5.5.
2. Wash with PBS 2-3 times at room temperature, 10-30 minutes with gentle rocking.
3. Fix in the dark overnight in 4% paraformaldehyde in PBS.
Storage
Store in fix or transfer to glycerol:
1. Wash 3 times with PBST ~10 minutes each at room temperature.
2. Replace with 50% PBS/50% glycerol/0.1% sodium azide. Allow larvae to sink.
3. Replace with 100% glycerol. Use only high quality glycerol because bad batches can leach purple precipitate from specimens.
4. Store in the dark or filet and mount on slides for immediate viewing.
NOTES AND REAGENTS
1Adapted from:
C. Thisse and B. Thisse, High resolution whole-mount in situ hybridization. Unpublished. T. Jowett and Y.-L. Yan. 1996. Two-color whole-mount in situ hybridization. In: P. Krieg (ed.), A Laboratory Guide to RNA: Isolation, Analysis, and Synthesis. Wiley. If you publish results obtained with this protocol, please cite one of the Parichy lab's recent publications or as a personal communication from D.M. Parichy.
2 10xMOPS buffer:
0.4 M MOPS, pH 7.0
0.1 M sodium acetate
10 mM EDTA
Autoclave for 1 hours and cool before using. Store at 4 °C.
3 RNA loading buffer:
1.5x dyes (0.06% bromophenol blue, 0.06% xylene cyanol)
1.5x MOPS
9% formaldehyde
60% formamide
0.1 mg / ml ethidium bromide
There are many other possible versions.
4 PBS, phosphate buffered saline:
To make 1 L of 10x stock:
NaCl 80.0 g
KCl 2.0 g
Na2HPO4 14.4 g
KH2PO4 2.4 g
ddH20 to 1.0 L
Dilute to 1X working concentration
5 PBST, phosphate buffered saline + Tween-20:
To make 1 L of 10x stock:
NaCl 80.0 g
KCl 2.0 g
Na2HPO4 14.4 g
KH2PO4 2.4 g
Tween-20 10.0 ml
ddH20 to 1.0 L
Dilute to 1X working concentration
6 PBST2, phosphate buffered saline + Tween-20:
To make 1 L of 10x stock:
NaCl 80.0 g
KCl 2.0 g
Na2HPO4 14.4 g
KH2PO4 2.4 g
Tween-20 20.0 ml
ddH20 to 1.0 L
Dilute to 1X working concentration
7 Proteinase-K (Roche) stock for in situs:
Aliquots are 10 mg/ml proteinase-K in proteinase-K storage buffer, stored at -80°C. Once thawed, aliquots may be stored at -20°C, but should not be refrozen at -80°C. To make aliquots, use an unopened 250 mg vial of lyophilized proteinase-K. Add to the vial, 11.25 ml ddH2O and gently dissolve the powder. Add 12.5 ml glycerol, 250 µl 1 M Tris pH 7.5, and 1 ml 500 mM CaCl2. Mix gently but thoroughly. Aliquot and store at -80 °C. Storage buffer final composition is: 50% glycerol, 10 mM Tris pH 7.5, 20 mM CaCl2 in ddH2O.
8 "Fake" hybridization solution:
Same as hybridization solution, but without expensive components.
formamide 250 ml
20xSSC 125 ml
10% Tween-20 10 ml
1 M citric acid 4.6 ml
ddH2O to 500 ml total
Store at room temperature.
9 Hybridization solution (T-hyb):
formamide 250 ml
20xSSC12 125 ml
50 mg/ml yeast tRNA 5 ml
10% Tween-20 10 ml
1 M citric acid 4.60 ml
50 mg/ml heparin 500 µl
ddH2O to 500 ml total
Scale up or down as appropriate. Aliquot and store at -20 °C. Note: Citric acid is used to give a final solution of pH ~5.5-6.0. Verifythat this pH has been achieved in the final solution.
10 Hybridization and pre-hybridization temperature:
Appropriate prehybridization and hybridization temperatures need to be determined empirically. 68°C is a good starting point.
11 Hybridization set-up:
12 SSC and SSCT:
Make 20xSSC stock for dilution to working concentrations of 2x, 0.2x, 0.05x and for use in hybridization solution.
20xSSC stock solution (3.0 M NaCl, 0.3 M trisodium citrate): Dissolve 175.3 g NaCl, 88.2 g trisodium citrate in 800 ml ddH2O. Adjust pH to 7.0 with a few drops of concentrated HCl. Adjust volume to 1 L with ddH2O. Sterilize by autoclaving.
To make 2x, 0.2x or 0.05xSSCT, dilute 20xSC with ddH2O and add 2 ml Tween-20 per L.
13 10xMAB stock:
For 1 L of concentrated stock solution, begin with ~750 ml ddH2O then add:
1 M maleic acid 116.07 g
1.5 M NaCl 87.66 g
Adjust to pH 7.5 with NaOH pellets initially (~72 g per liter) then 10 M NaOH solution. Buffer will clear around pH 6.0. Desired pH is easy to overshoot!
Fill with ddH2O to 1000 ml
Use at 1x for washes, etc.
14 Antibody blocking solution:
5% heat inactivated goat serum, 2 mg / ml BSA in PBST2. Sterile filter and store at 4 °C. Goat serum is heat inactivated by incubating 45 minutes at 50 °C, aliquot and freeze at -20 °C.
15 Roche blocking reagent:
To make a 10x stock (10% w/v), dissolve 10 g Roche blocking reagent in 100 ml 1x MAB over moderate heat with stirring. Aliquot and store at -20°C. For working strength, dilute to 1x with MAB.
16 Fish powder:
Fix adult fish in formalin for 1-2 hours at room temperature. Wash in tap water 1-2 hours and place in blender. Puree. Add acetone or methanol and centrifuge in SS34 or larger rotor. Pour off supernatant and repeat several times. Transfer pellet to open dish, spread, and allow to dry in 60-70°C air incubator. Once dried, store in sealed vial at 4°C.
17 Plastic vials:
Nalgene 4 ml polypropylene with holes melted through top and bottom, then covered with 250 µm Nytex mesh attached with heat.
18 AP buffer:
100 mM Tris HCl pH 9.5, 50 mM MgCl2, 100 mM NaCl, 0.1% Tween-20
Make fresh daily from stocks, to make 200 ml (scale up if necessary):
ddH2O 164 ml
1 M Tris 20 ml
1 M MgCl2 10 ml
5 M NaCl 4 ml
10% Tween-20 2 ml
17 NBT/BCIP Staining solution
AP buffer 50 ml
50 mg/ml NBT 225 µl
50 mg/ml BCIP 175 µl
Make NBT stock from powder in 70% dimethylformamide, 30% H2O in glass or polypropylene because the DMF will dissolve other plastics